
It is necessary to plan and frame a deck properly for it to be safe, durable, and beautiful. A wrongly framed deck may result in structural failure, expensive repairs, or even injuries. This guide will take you through step by step process of how to frame a deck, starting with the first planning to final framing; it will help you to build a sturdy outdoor space that endures.
Checklist for Tools and Materials
Gather these essentials:
- Tools: Circular saw, drill, post hole digger, laser level, clamps, hammer.
- materials: lumber with pressure treatment, galvanized metal (joist hangers, bolts, screws), concrete mixture, gravel, flashing.
Hack: Use a mini-excavator on big works to avoid a sore back.

What is the Procedure of Planning and Framing a Deck?
The inclusion of a deck to a house enhances the attractiveness of the house, provides an ideal location to hold company, and improves the value of the property. It depends on careful planning and exact framing. When these are in a hurry, the boards may sag, the railings may give way, or even worse, they may fall down. You can be a DIYer building an oasis in the backyard, or you can hire the professionals to take on bigger jobs, but knowing the basics of pool deck framing plans will ensure that your deck is all that you need.
Step 1: Preparing the Groundwork
Start with a clear vision. Draw the size, shape, and characteristics of your deck, whether you want it to be simple-rectangular or dramatic- multi-level. Calculate your yard while keeping in mind the setbacks of property lines.
Next, assess soil and terrain. Heavy soils should be tested to be stable because their position can change when moist. Test holes to determine drainage; soil that is poor requires more footings or gravel bases.
Use local climatic materials. Frame using pressure-treated pine or cedar to resist humidity and termites. In the case of tropical hardwood such as teak, FSC certification is recommended to prevent the problem of illegal logging. Determine load capacity: residential decks can accommodate 40-60 psf live load (people and furniture).
Step 2: Site Preparation for The Construction of a Solid Foundation
Clear out the space of plants, roots, and litter. It is advisable to have a ground that is slightly sloping away (1/4 inch per foot for standard deck size) to allow the water to run off.
Draw marks with batter boards and string lines. Mark the corners of the stake exactly, and use chalk to draw footings. Excavate post holes: 36-48 inches below the frost line. Pour concrete piers using Sonotubes with galvanized post anchors. Let it cure for 48 hours.
Put a ledger board on your house. This anchors the deck frame. Drill lag screws (1/2 inch diameter, 6 inches long) into rim joists or band boards and flash over with Z-bar metal to avoid rot. Seal gaps with caulk. In case of freestanding decks, do not use a ledger but increase the posts to provide stability.
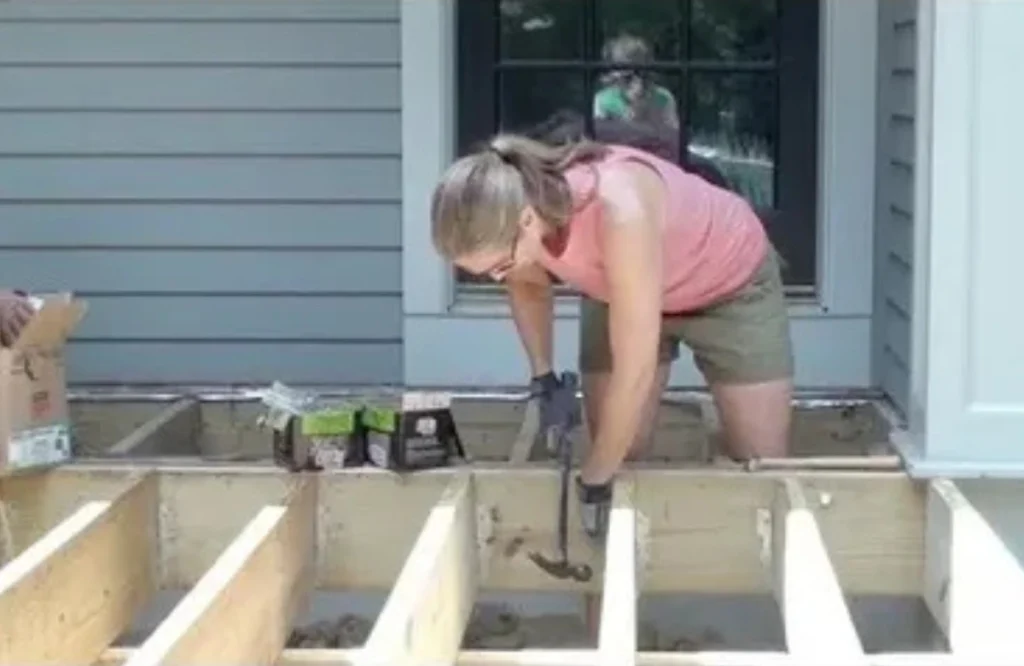
Step 3: Framing the Deck With Accuracy
The skeleton of the deck is formed with the help of posts, beams, joists, and rim boards through framing. Begin by making the posts straight and firm, bases cemented in the footings.
Then place the principal beams over the posts. Lay them down to make them strong, and have them fastened down with bolts. Ensure that the upper sides are slightly curved inwards to assist in the draining of water.
Fasten the outer frame with rim joists and complete the frame. Next, place floor joists over the frame, which should be evenly spaced and attached with hangers or nails. When you are adding stairs, cut stringers to suitable, comfortable step heights and depths. The diagonal supports should be used to hold all the parts in place so that the structure does not wobble.
It is important to ensure that it is straight and even before proceeding. This is done to make your deck sound.
Step 4: Safety Checks and Finishing Touches
Inspect for level and square. Make use of a long straightedge and strings, with shims under posts. Confirm that diagonals are square. Install decking under-structure, as required, such as sleepers on concrete. Apply metal flashing on beams and joints to prevent moisture infiltration. Now is also the time to install a deck bench if you had planned to do so.
Common Mistakes to Avoid
Short footings are not a good idea; always try to exceed code minimums. Failure to consider the moisture content of wood leads to warping; acclimate lumber 1-2 weeks on-site. Over-spanning joists are known for sagging under weight; use tables according to the American Wood Council.
Rot is an invitation to poor flashing, particularly in damp climates. Neglect railings? Codes necessitate 36 inches high with balusters less than 4 inches apart.
Hiring Professionals vs. DIY
DIY is safe to cover low-level decks less than 200 sq ft. To construct high or complicated designs, employ qualified workers like Hitchcock Roofing & Construction. After knowing how to frame a deck properly, you can spend years of barbecues and monsoons with your deck standing. Cover it with composite boards in order to make it low-maintenance, seal edges, and provide lighting.
FAQs
What is the depth of the deck footing?
Footings should extend under the local frost line, which is normally 36-48 inches in colder areas. For stability, use concrete piers on gravel bases.
Which wood framing is the best for deck construction?
Use pressure-treated lumber or naturally rot-resistant material such as cedar. Always fight corrosion with galvanized or stainless steel fasteners.
Is a permit required to construct a deck?
Yes, a majority of locations in the US would need a permit to have decks of a particular height or size. Check the IRC building code and present plans to be approved.